 .
.|
How Do I ... ? |
Use the Scheduler |
|
|
The Scheduler Component can be used to fire sequences of events over a period of time.
There is a multimedia walk-through of these techniques in the online
Technical
Resources.
The Scheduler Component allows you to define at design-time any number of events: each event has a relative time delay. At run-time, when the Scheduler Component is started, each event will fire after its specified delay has elapsed. Delay times can be as short as one millisecond and as long as one day.
To use the Scheduler Component:
add the Scheduler Component to your form,
define an Event Schedule,
program Actions for each event in the Schedule,
create an Action to start the Scheduler.
The Scheduler Component, when started, fires its events relative to the triggering event. For events to be scheduled at absolute times you should use the Calendar Component.
Tip
You are not limited to just one Scheduler Component: your forms may have as many Scheduler Components as you require, each with their own unique Event Schedules.
From the Components tab of the Toolbox click and drag a Scheduler component onto the form: it will appear in the component tray area below the form.
In the Property Grid is the EventSchedules collection property: click the ... button to open the Event Schedule dialog.
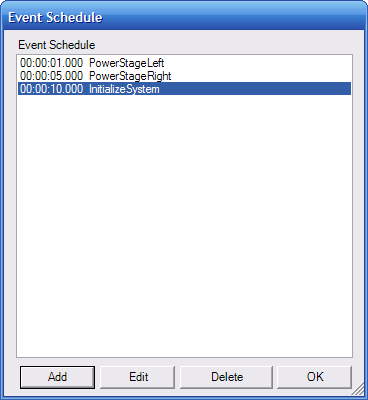
The Scheduler Component's Event Schedule dialog
To create the first event, click Add to open the Edit Schedule dialog.
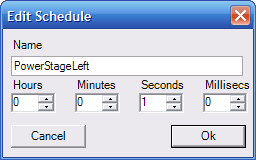
The Scheduler Component's Edit Schedule dialog
Specify a Name of "PowerStageLeft" and a time of 00:00:01.000 and click OK.
Create a second event named "PowerStageRight" with a time of 00:00:05.000.
Create a third event named "InitializeSystem" with a time of 00:00:10.000.
Click OK to save the Event Schedule and close the dialog.
The events defined in the Event Schedule are now like any other event generated from a device or control. However, before the Scheduler Component processes its schedule and generates events, you need to create an Action to start it. Events are fired relative to when the Scheduler Component is started, and only when the form it resides on is visible.
From the Windows tab of the Toolbox click and drag a Button control onto the form.
Set the button's Text property to "Start".
Double-click button1 to display the Actions Editor.
Add the following Action
to call the Start method of the
scheduler1 component:
Controls –
Form1 –
scheduler1 –
Start
Click Ok to close the Actions dialog.
You can now program the desired Actions for each scheduled event.
Double-click scheduler1
in the component tray to display the Actions Editor.
Note that the selected event is scheduler1.PowerStageLeft:
this is the first scheduler event that we wish to program.
Add the following Action
to set the button's Text property:
Controls –
Form1 –
button1 –
Set Text to –
Variables –
"Power Stage Left"
Change the selected
event to the second scheduler event:
Controls –
Form1 –
scheduler1 –
PowerStageRight
Add the following Action:
Controls –
Form1 –
button1 –
Set Text to –
Variables –
"Power Stage Right"
Change the selected
event to the third scheduler event:
Controls –
Form1 –
scheduler1 –
InitializeSystem
Add the following Action:
Controls –
Form1 –
button1 –
Set Text to –
Variables –
"Initialize System"
Click Ok to close the Actions dialog.
Run the form and click Start: after 1 second the button's label will change to "PowerStageLeft"; after 5 seconds changes to "PowerStageRight"; and after 10 seconds changes to "InitializeSystem".
Tips
After the Scheduler Component completes its event schedule, it can be restarted again at any time.
You can create complex and sophisticated event patterns by using a Calendar Component in conjunction with your Scheduler Component: the Calendar Component could be used to start the Scheduler Component at specific dates and times, and with a recurrence such as daily, weekly, etc.
Note how the UI is still responsive whilst the Scheduler Component is active and running. Events are fired asynchronously An asynchronous operation executes independently from the action which started it. The application can continue performing other tasks while the asynchronous operation performs its task., allowing the form, controls and devices to continue to respond and process their own Events and Actions.