 .
.|
How Do I ... ? |
Use the Calendar |
|
|
The Calendar Component can be used to fire recurring events at specific times or days.
There is a multimedia walk-through of these techniques in the online
Technical
Resources.
The Calendar Component allows you to define at design-time any number of events: each event has specified time. At run-time, when the Calendar Component is running, each event will fire at its specified time.
To use the Calendar Component:
add the Calendar Component to your form,
define an Event Schedule,
program Actions for each event in the Schedule.
The Event Scheduling capabilities of the Calendar Component are extremely powerful and versatile.
Events can be scheduled to start and end on specific dates and times, and can also be configured with a recurrence pattern, which means they continue to fire at a specific period, such as daily, weekly, etc. and then keep recurring forever, or end on a specific date or after a number of occurrences.
Date and Time: the event starts on a specific date, and fires at a specific time of day.
Disabled: the event only fires once, at the specified Data and Time.
Daily: the event recurs every day, every n days, or every weekday from the Start Date
Weekly: the event recurs every week or n weeks, and only on a specific selection of days.
Monthly: the event recurs every month or n months, and on a specific day or the nth weekday.
No End: the event continues to fire forever with the specified recurrence pattern.
End after n times: stops the event after a specific number of occurrences,
End on a date: stops the event recurring on or before a specific date.
Tips
The minimum recurrence period you can configure using the Calendar Component is daily, or every 24 hours. To create recurring events which fire at periods shorter than one day, for instance every two hours, you can use a Scheduler Component containing the finer resolution events, then use a daily event from your Calendar Component to start the Scheduler Component.
The Calendar Component can also be enabled or disabled programmatically. Disabling a Calendar Component stops all scheduled events from firing.
From the Components tab of the Toolbox click and drag a Calendar component onto the form: it will appear in the component tray area below the form.
In the Property Grid is the EventSchedules collection property: click the ... button to open the Event Schedule dialog.
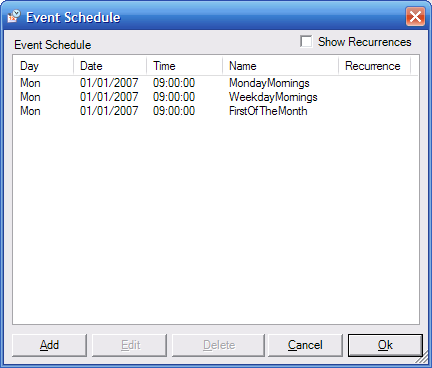
The Calendar Component's Event Schedule dialog
To create the first event, click Add to open the Edit Schedule dialog.
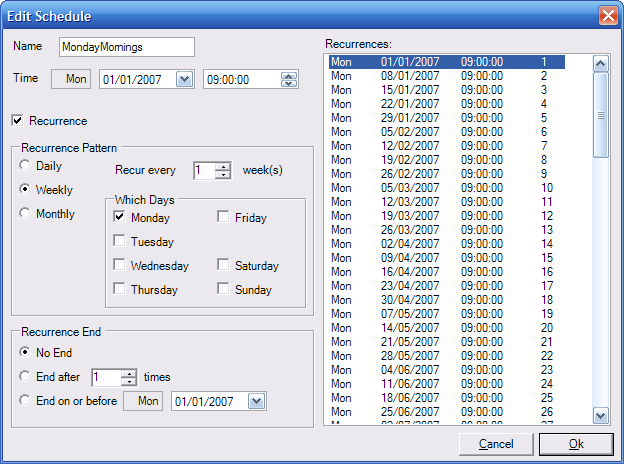
The Calendar Component's Edit Schedule dialog
Specify a Name of "MondayMornings" with a Start Time of 09:00:00.
Specify a Recurrence Pattern of Weekly, with selected Days of Monday and click OK.
Create a second event named "WeekdayMornings" with a Start Time of 09:00:00.
Specify a Recurrence Pattern of Daily, with Recur Every Weekday enabled.
Create a third event named "FirstOfTheMonth" with a Start Time of 09:00:00.
Specify a Recurrence Pattern of Monthly, with On The option set to 1st.
Click OK to save the Event Schedule and close the dialog.
The events defined in the Event Schedule are now like any other event generated from a device or control. Scheduled Events are only fired if the Calendar Component is enabled, and the form it resides on is visible.
To see the events in this example as they occur we will create a list box control which will accumulate the event names as the scheduled events fire. To populate the list box control from the scheduled event Actions, we must also create a small script.
From the Windows tab of the Toolbox click and drag a ListBox control onto the form.
From the Components tab of the Toolbox click and drag a Script component onto the form.
In the Property Grid is the ScriptData property: click the ... button to open the Script Editor.
In the Script Editor, select all of the default script and delete it.
Copy and paste this code fragment into the Script Editor and click OK:
using System;
using System.Windows.Forms;
using Stardraw.Project;
using Stardraw.Control;
public class MyClass
{
private System.Windows.Forms.ListBox listBox;
[Controllable]
public void AddItem( string itemName )
{
listBox.Items.Add( itemName );
}
[Controllable]
public System.Windows.Forms.ListBox ListBox
{
get { return listBox; }
set { listBox = value; }
}
}
In the Property Grid
is the ListBox property: click
the drop-down list and select listBox1.
This now enables us to add items into the list at run-time using Actions.
You can now program the desired Actions for each scheduled event.
Double-click calendar1
in the component tray to display the Actions Editor.
Note that the selected event is calendar1.MondayMornings:
this is the first scheduler event that we wish to program.
Add the following Action
to set the button's Text property:
Controls –
Form1 –
script1 –
Set AddItem to –
Variables –
"Monday morning"
Change the selected
event to the second scheduler event:
Controls –
Form1 –
calendar1 –
WeekdayMornings
Add the following Action:
Controls –
Form1 –
script1 –
Set AddItem to –
Variables –
"Weekday morning"
Change the selected
event to the third scheduler event:
Controls –
Form1 –
calendar1 –
FirstOfTheMonth
Add the following Action:
Controls –
Form1 –
script1 –
Set AddItem to –
Variables –
"First of the month"
Click Ok to close the Actions dialog.
To see the events without having to wait in real-time, we can temporarily alter the computer's system clock so that the Calendar Component thinks it is the correct time to fire the event.
Run the form, and set the system clock to the second Monday of the current month, and set a time of 08:59:55 and click Apply. In a moment you will see two new items added to the list box ("Monday morning" and "Weekday morning") as the time ticks over to 09:00:00.
Now set the system clock to any other weekday of the current week, and reset the time to 08:59:55 and click Apply. You will see one item added to the list box ("Weekday morning") as the time ticks over to 09:00:00.
Finally set the system clock to the first day of the current month, and reset the time to 08:59:55 and click Apply. You will see two items added to the list box ("Weekday morning" and "First of the month") as the time ticks over to 09:00:00.
Note how the UI is still responsive whilst the Calendar Component is active and running. Events are fired asynchronously An asynchronous operation executes independently from the action which started it. The application can continue performing other tasks while the asynchronous operation performs its task., allowing the form, controls and devices to continue to respond and process their own Events and Actions.