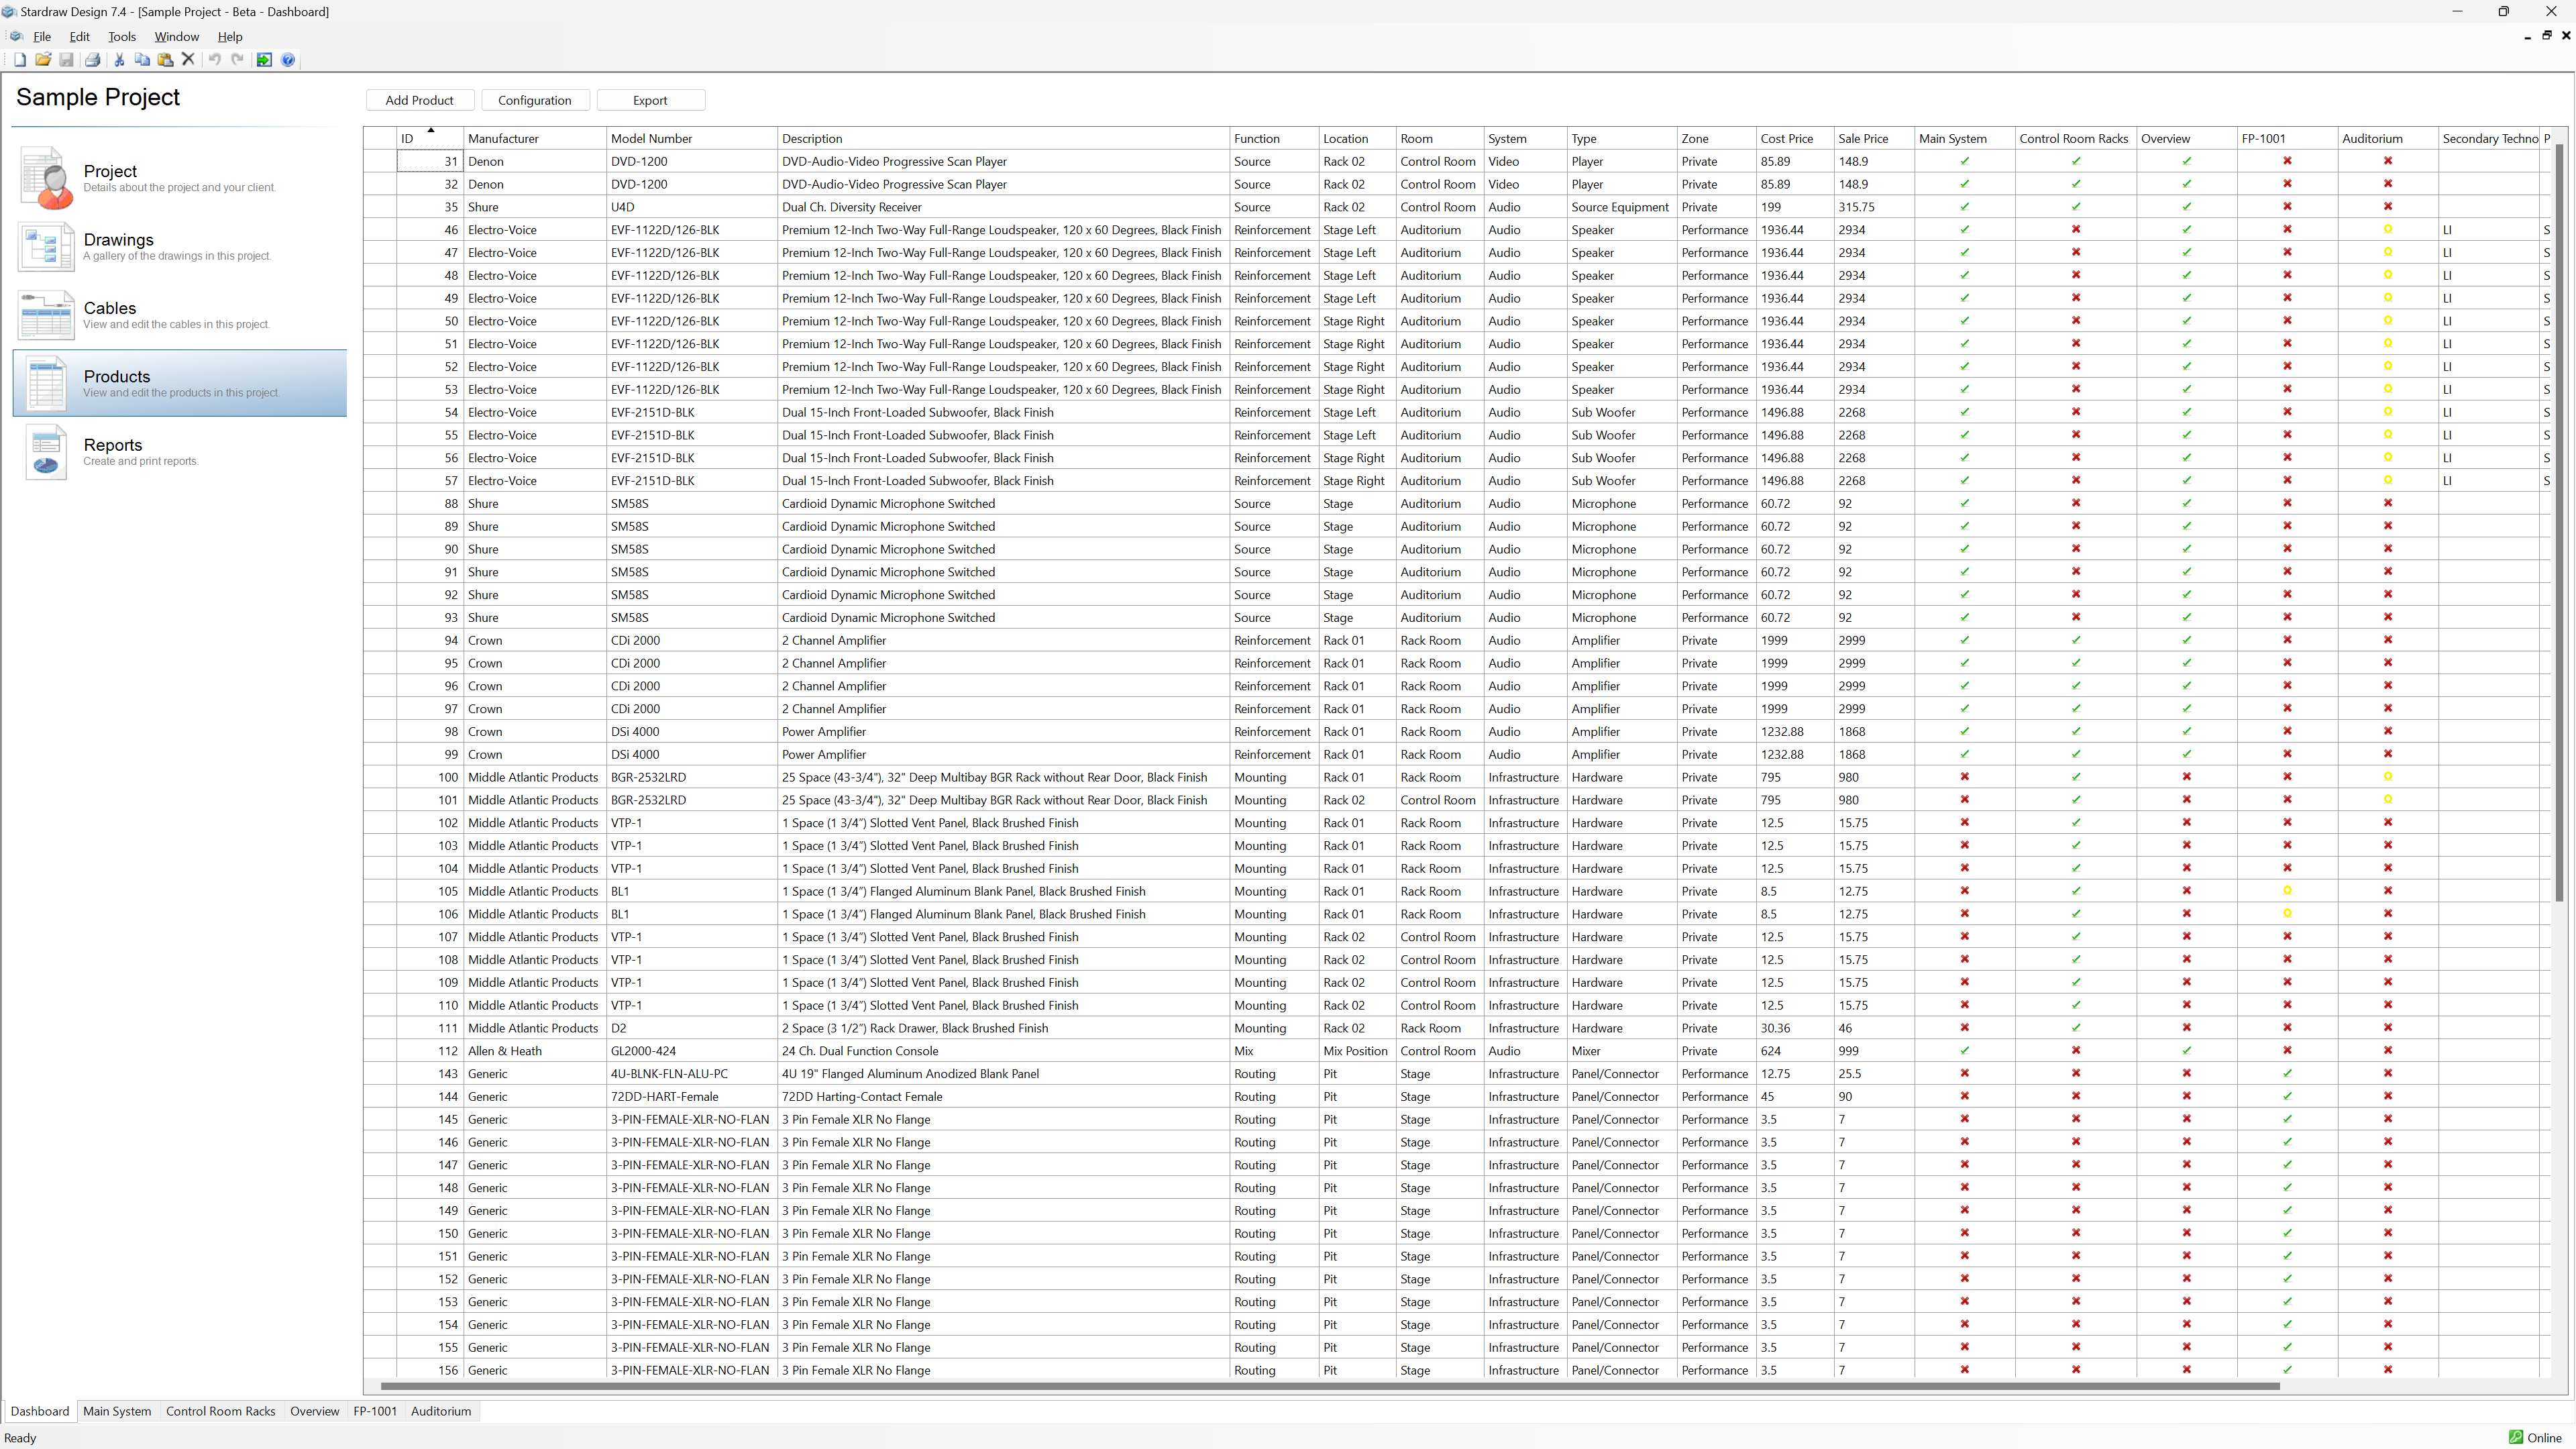
Products View
The Products View is accessed through the Project Dashboard and performs a dual role. Use it to:
- Search for and add products to your project
- Manage the products in your project and their Attribute values.
The Products View is an optional Utility included in Stardraw Design 7 Gold level bundles and above.
Adding Products to your Project
Click on the Add Products button to display the dialog that allows you to Search for products, select which and how many to add to your project and, optionally, set Attribute values at time of adding them.
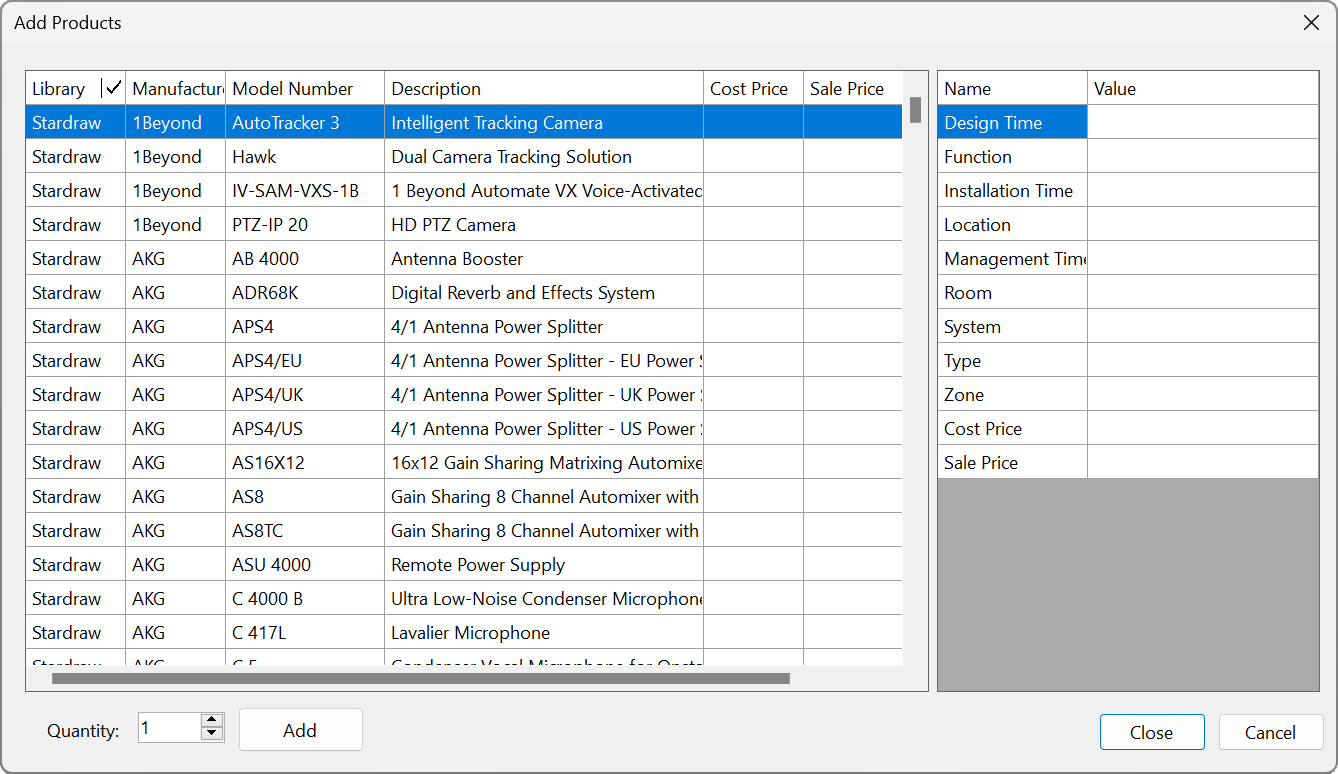
Adding Products to your Project
- Type into the Search box to filter results. All words, separated by spaces, act as filters on the Model Number and Description fields so, for example, the following search
Switcher Matrix DM
will return all products that contain all of those terms, in any order, in their Model Number or Description. Searches are case-insensitive.
- Doubleclick on a result to add 1 instance of that product to your project
- Click on a result to highlight the product, set a number in the Quantity field and click on Add, or hit Return, to add that number of instances of the product to your project.
- You can filter by the values in any column (see below). In the Add Product dialog the first column, Library, refers to the source of the product data
- "Stardraw" means the product comes from the Stardraw Design 7 library.
- "User" means the product comes from your own User Defined Products library.
- You can filter by library to show only the Stardraw or User libraries, or leave the filter clear to show both libraries.
- You can use the Attributes grid on the right of the Add Products dialog to set values for Attributes when adding the product(s); this saves a lot of time if you're adding a large quantity of products because you can add the same value across all new instances of the products, and set multiple Attributes, in a single action.
Working with the Grid
Click and drag a column heading to re-order the columns.
Click on any column heading to sort by the values in that column.
Use Ctrl+Click on a column heading to:
- Perform a secondary sort using that column's values, or
- If you are already sorting by that column, to remove sorting.
Configuration
Click on the Configuration button to display the Product Columns dialog.
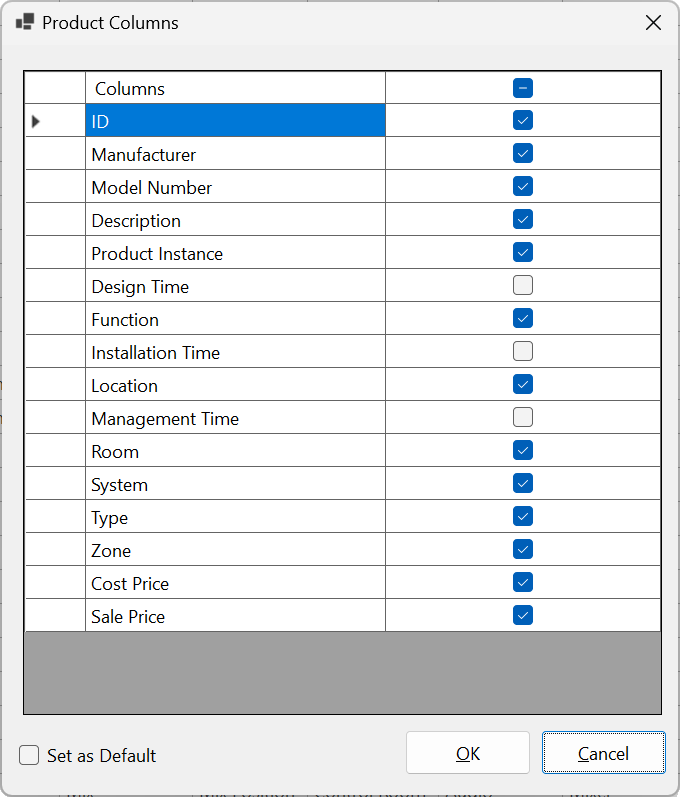
This dialog lists all Product Attributes that can be displayed in the Products View. Check/uncheck the visibility checkbox to show or hide that column. Click OK to apply the configuration to the current project.
Setting Default Columns
When you have established the desired visibility state for columns in the Products View, check the Set as Default checkbox and click OK to apply this configuration as your default for new projects.
Filtering
Click on the down arrow that appears in a column heading when you hover the cursor over it to reveal the Filter tool.
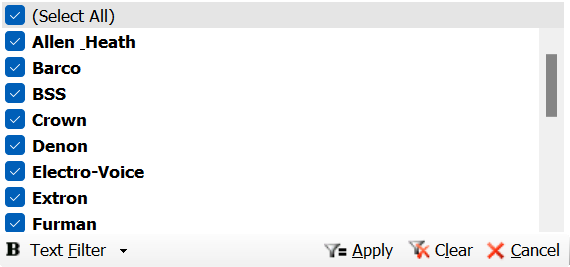
The Filter tools allow you to show and hide data in the Products View based on particular values in the selected column.
- You can check/uncheck individual values to show/hide rows containing those values.
- Check/uncheck (Select All) to make it easier to filter by a single or small selection of values, or to clear current filters.
- Use the Text Filter, bottom left, to build an expression by which to filter e.g. Contains = "Amp" to show any results that include "Amp" as part of the value.
- You must click on Apply to activate the changes made in the Filter dialog.
- The column heading shows a ✓ icon if filtering has been applied to that column. To remove filtering, click on the ✓ icon and select Clear.
Entering Data in Cells
Doubleclick on a cell to enter/edit data in that cell. Note that the following columns are read-only and their values cannot be edited:
- ID
- Manufacturer
- Model Number
- Description
You can drag over multiple cells to select them; copy/paste on single or multiple cells behaves much like a spreadsheet application so you can, for example:
- copy one cell and paste into multiple cells,
- copy a range of cells in one row and paste into multiple rows,
- copy a range of cells and paste into a range of the same shape,
- select a range of cells and Delete their values in a single action.
You can dynamically copy the contents of one cell into adjacent cells by dragging; as you approach the bottom right corner of a selected cell the cursor will turn to a cross (+) indicating that you can drag and copy the contents to adjacent cells in any direction. If the cell's value ends in a number you can increment that value in the cells you're copying to by holding down the Ctrl key as you drag.
Products View Drawing Columns
At the end of the Products Grid, after the columns that show Attribute values, you will see a column for each drawing in your project. These columns serve 2 purposes:
- An icon shows the symbol status for each product as it pertains to that drawing.
- If the product symbol is present in the drawing - i.e. a green tick is shown - you can click on the icon to jump to that drawing and select the symbol and if a symbol is available but not yet in the drawing - i.e. a yellow circle is shown - you can click on the icon to jump to that drawing and select the product instance in the Available Symbols Palette.
The following icons indicate product symbol status:
 Symbol is present in the drawing.
 Symbol is not in the drawing.
 Product is a Stardraw Library product and no symbol is available for this drawing type.
 Product is User Defined and no symbol is available for this drawing type. Click to open UDP Wizard to create a new symbol.